
Easter is approaching us, chocolate eggs are on the shelves, and you may already be observing the occasion by partaking in Lent! At Singer Outlet, we’re here to put a smile on your face during the run-up to spring, even if you’ve given up sugary sweets or you’re avoiding coffee for 40 days. If you’re struggling through your sacrifice, remember you needn’t forfeit family fun for Easter.
Use the holiday to enjoy your children’s company and encourage their creativity. Here are some Easter crafts for the whole family dedicated to helping you bond and relax in your free time.
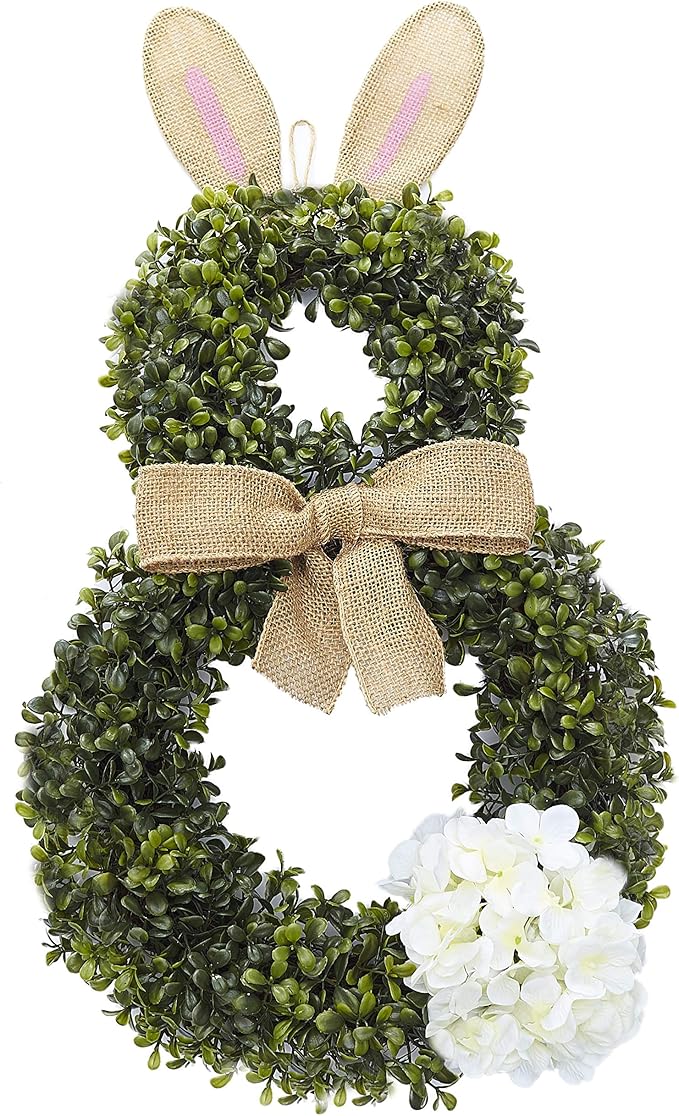
Craft #1 - A Bunny Rabbit Wreath
What are festivities without tasteful decorations? Well, they’re less pretty; that’s for sure. It stands to reason that you need an Easter wreath to deck out your door! Though an egg is an excellent option for the shape of your wreath, that is so easy it’s been overdone. However, with a bit of patience and some skill, you can create a door decoration in the shape of a bunny rabbit. The kids will love it!
What You’ll Need:
- A hot glue gun (and adult supervision at all times!)
- A glue stick.
- A pair of general scissors.
- Two sheets of sturdy card material, one in pink and another that’ll match your pipe cleaners.
- A pack of grey, white or brown pipe cleaners and a white pom-pom.
- Two rings made from wire, one slightly smaller than the other.
- A set of decorations, such as fake flowers and bows.
Follow These Steps:
- Take your wire rings, and wrap pipe cleaners around them to join them together and cover the metal. These will make the body and the head of your bunny rabbit.
- Cut your sturdy card into the shape of bunny ears. Cut your pink card slightly smaller than the pieces that match your pipe cleaners.
- Glue the pink card on top of your fur-coloured pieces to replicate the inside of bunny ears.
- Hot glue your bunny ears onto the top ring of your wireframe.
- Tie a bow around the wire where your two rings meet. It should resemble a collar.
- Hot glue your white pom-pom into the bottom-right edge of your bunny frame to create a tail.
- Finish decorating your frame with fake flowers as a final touch.
- Hang up your wreath to the door by hooking the head onto a nail.
Craft #2 - A Felt Easter Egg
Chocolate Easter eggs either melt or disappear down your throat. Unfortunately, you can’t keep confectionery that will spoil as an annual decoration. Luckily, we have the solution for you at Singer Outlet. Create an egg you can display time and time again with felt! Little ones can decorate their creations however they’d like, with buttons or charms and colourful thread.
What You’ll Need:
- Three or four different sheets of felt.
- Cotton wool.
- A pair of tailor or heavy-duty sewing scissors.
- A selection of buttons and charms.
- Sewing machine thread sets in unique colours.
- A roll of beautiful ribbon.
Follow These Steps:
- Identically cut two pieces of felt into the shape of an egg, as big or as small as you’d like. You can use two different coloured felt sheets, or they can match.
- Create beautiful patterns on both sides of felt with fun stitches or small extra felt pieces in any colour or design you desire.
- Pull away and flatten a wad of cotton wool that is slightly smaller than the size of your felt.
- Sandwich the cotton wool between your two pieces of felt, and stitch the ovals together at the edge with colourful thread. A blanket stitch will work best.
- Decorate your egg by attaching buttons or charms wherever you’d like.
- Cut a piece of ribbon from your roll. Ensure it is long enough to loop, but not so long it’ll look out of balance compared to the size of your egg.
- Sew the ribbon loop to the top of your felt egg, and hang wherever you’d like to display it.

Craft #3 - A Cardboard Egg Cup
Buying ceramic egg cups requires no talent, and it doesn’t offer much enjoyment. Instead, you can unleash your creativity and craft egg cups from cardboard! This craft is so simple it will suit even the youngest family members. A new, steady egg cup will make painting your hard-boiled eggs that much easier, so you can host a satisfying decorating competition too.
What You’ll Need:
- Toilet paper rolls.
- Fun and whimsical stickers.
- Felt tip pens.
- A pair of general scissors.
- Patterned paper and glue (totally optional!)
Follow These Steps:
- Cut your toilet paper rolls into thirds as gently as you can. You want every piece to retain its circular shape since the egg will sit there.
- Decorate your portion with felt tip pens and whimsical stickers. Uphold an easter theme if you can but feel free to go wild if you’re competing against each other!
- You can stick patterned paper around your egg cup if you’d like to go the extra mile. You’ll achieve a brighter coloured finish than the typical brown background of cardboard.
Craft #4 - A Macrame Easter Basket
A macrame Easter basket is a more mature craft that’ll suit teenagers through to adults. You’ll enjoy all the relaxation and satisfaction of tying beautiful knots, with the final result of an impressive basket. Store your chocolate eggs in the finished product, or hold an Easter egg hunt with your nieces and nephews when they swing around during the holidays. The possibilities are endless!
What You’ll Need:
- Twenty-four pieces of 2.5-metre long macrame cord.
- Twenty-four parts of 1.5-metre long macrame cord.
- Two pieces of 50cm long macrame cord.
- A pair of general craft scissors.
- Measuring tape.
- A beautiful cut of ribbon.
Follow These Steps:
- Read up on macrame, how to start, and the 7 knots you need to know. You’ll need a basic understanding of the process to begin crafting a basket.
- Attach twelve of your 2.5-metre long macrame cords to your beautiful piece of ribbon using reverse larks head knots.
- Complete a whole row of square knots between your twelve cords.
- Incorporate a new piece of 2.5-metre long cord into your next row by using it in a square knot. Add a new thread into the craft for the first and the last knot in the row.
- Repeat step number four until you’ve got six rows of knots.
- Next, complete fourteen rows of regular square knots, incorporating no new cords.
- Finally, add four rows of square knots that decrease the first and last pieces. Your knots will assume a ‘V’ shape. You’ve got the back of your basket!
- Let’s start creating the front of the basket. Tie two 1.5 metre long cords together in a square knot. Then add two extra pieces of the 1.5-metre long thread by knotting them in the next row.
- Add another row of square knots, with two more 1.5 metre long cords at the beginning and the end.
- Complete steps 8 and 9 another three times to have four separate pieces.
- Join the pieces by adding six rows of alternating square knots between them.
- Complete four rows of alternating square knots, decreasing the last and first knots.
- Start to join the basket’s back to the front by positioning the bottom of each piece directly parallel to one another. Create double overhand knots between the opposite parts of the cord.
- Once the knot to join the pieces is complete, cut the cord to leave only an inch and a half in length.
- Tie up the sides with your remaining cord for added security.
- Use the ribbon to hang your basket with pride. Fill it with sweets and Easter treats!
Refresh Your Crafting Cupboard With Singer Outlet!
Are you running low on materials, though you’d love to complete these crafts? We’re here to help. Order yourself some sewing supplies and enjoy convenient creativity as we deliver your shop to the door. Contact us to find out more!